|
|
Materials:
- Aluminum foil roasting pans or aluminum pie pans
- Small pieces of cardboard
- Wire or paper clips
- Scissors
- A Nail
- Colored permanent markers
- Acrylic paints
- Paintbrushes
|
|
|
Instructions:
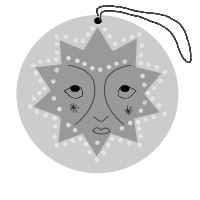
- Draw a shape of your choosing on the bottom of an aluminum pan. Animal shapes work really well with this project.
- You may even want to practice by drawing your designs on paper first.
- Carefully cut out the aluminum design.
- Place the aluminum cut-out onto a piece of cardboard for padding. Then, using a nail and gentle pressure, make dot-impressions into the soft metal. Be careful not to puncture the aluminum with the nail.
- The result should be a decorative series of raised dots on your aluminum ornament.
- Next, use permanent markers and acrylic paint to color the ornament. You may even want to add glitter. The goal here is to make them sparkle brightly.
- Finally, use a nail to poke a single hole in the top of each ornament. Insert a wire hook, or looped string for hanging around the house.
[Return To List]
|
|
Materials:
- Colored tissue paper
- String
- Glue
- Scissors
|
|
|
Instructions:
- First, cut the tissue paper into manageable sections. I generally cut my tissue paper into quarters.
- Take a single piece of tissue paper and fold it in half.
- Fold it in half again. Now, the paper is divided in fourths.
- Finally, fold it in half once more. This divides the paper into eigths.
- Keeping the paper folded, lightly sketch basic geometric shapes onto its surface. Concentrate particularly on the folded edges.
- Cut out the designs.
- Unfold the paper. Voila!... A masterpiece.
Make several pierced papers. You will use them to assemble a party banner.
- Next, tie a long piece of string between two chairs. Fold one edge of each tissue paper rectangle over the string and glue the edge down. Space your pierced papers evenly along the string.
[Return To List]
|
|
Materials:
- Colored posterboard
- Multi-colored ink pad
- Glue
- Scissors
- Ball-point pen
- Polystyrene trays - found in craft stores
|
|
|
Instructions:
- Cut off the sides of a polystyrene tray. The tray bottom is all that should remain.
- Next, use a pencil to lightly sketch an intricate geometric design onto the surface of the tray.
- Trace over your drawing with a ballpoint pen. Press firmly without puncturing the material.
- Take a piece of colored posterboard and cut it to the size of a placemat.
- Press your polystyrene stamp into the rainbow ink pad. Make sure the ink covers the design evenly.
- Print your design across the posterboard. Space evenly and re-ink your stamp as necessary.
[Return To List]
|
|
|
|