|
|
Materials:
- Paper plates
- Thin brown, yellow or red ribbon
- Colorful markers
- Scissors
- Sponges
- Water-based paints
- Paintbrushes
- Popsicle or craft sticks
- Hole punch
- String for wearing the mask
- Glue
- Newspaper
|
|
|
Instructions:
- Lay newspaper underneath your project.
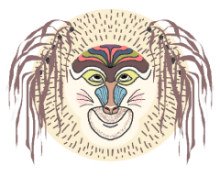
- Take a single sturdy paper plate; draw short brown or black lines radiating outward around the entire circumference of the plate. You may even use the "natural" grooves of the plate to do this.
- Use the sponge and dab brown water color over these lines to give them an organic look.
- In the center of the plate, draw two large spiraling eyes.
- Draw a wide nose with nostrils flaring.
- Draw a happy, smiling and wide mouth. This monkey is a mischievious character - you want to reflect this with the expression on the monkey's face.
- Draw symmetrical stripes on the monkey's cheeks, and color them in with your markers.
- Punch holes around the temples of mask. Locate them to above and to the side of eyes. Several holes on each side should be fine.
- Insert strands of brown, red and yellow ribbon into these holes. This give the monkey a dramatic, wild-hair look.
- Secure the ribbon with knots and/or glue.
- Finally punch two holes in the upper corners of the mask. Insert string for wearing the mask. Adjust the string appropriately to fit your face.
[Return To List]
|
|
Materials:
- 60cm x 90cm (24in. x 36in.)piece of butcher paper
- Colorful variety of tissue paper - scraps are fine
- 3cm x 60cm (1in. x 24in.) strip of thin cardboard
- Crepe paper
- Ribbon
- Scissors
- Hole punch
- String
- Glue
- Newspaper
|
|
|
Instructions:
Creating the Carp:
- Draw a large fish silhouette onto tissue paper. Your fish should fit neatly onto the kite - so, it should not be larger than the butcher paper.
- Take scraps of different colored tissue paper and cut out fish scales, fish fins, gills and fish eyes. Glue them onto your initial fish silhouette.
- Put the completed tissue paper fish aside.
Assembling the Kite:
- Fold the short end of the butcher paper over 3cm (1 in.).
- Place the 60cm-long cardboard strip into your fold. Glue it into place - making sure that it is lined up evenly before you glue it.
- Next, fold your butcher paper in half (down the long side).
- Place a bead of glue along the long edge of the butcher paper. Glue to the two edges together.
Decorating the Kite:
- Take the tissue paper fish prepared earlier. Glue it onto the assembled kite.
- Use long scraps of tissue paper and cut them into thin strips. Glue these streamers to the tail end of the kite. You can use ribbon for streamers as well.
- Open up the "mouth" of the kite by bending the cardboard strip into an "o" shape. This allows the kite to catch the wind.
- Finally, use a hole punch to create two holes around the mouth of your kite. Thread two strings into the holes and tie them off. Use these strings to fasten the completed kite onto one end of a long pole.
[Return To List]
|
|
Stylish Styrofoam Prints:
|
Materials:
- Styrofoam meat trays
- Colored construction paper
- Water-soluble ink - in several colors
- Ball point pen
- Scissors
- Newspaper
- Wooden dowels
- String
- Glue
|
|
|
Instructions:
The object of this craft is to use styrofoam stamps to create an elaborate Asian-themed design.
- Cut the sides from the styrofoam meat trays, leaving the flat smooth bottoms.
- On a piece of the styrofoam, draw a single design element. Examples are: yin and yang, a circle, a tiger, a fish, etc. Press hard enough to make fairly deep grooves in the styrofoam - without puncturing the material.
- Protect your work surface with several layers of newspaper. And assemble your printing supplies.
- Pour some water-based ink into intact styrofoam meat trays. Prepare a separate tray for each different ink color.
- Place your styrofoam stamp drawings into the ink, and then press them onto your piece of construction paper.
- Use the different stamps that you made to create an elaborate printing. A good rule of thumb is to space your stampings evenly across the entire surface of the construction paper.
- Once your design is complete and dried, glue the wooden dowels to the back of your picture. Place them at the top and bottom edges for stability.
- Attach a long piece of string to the top dowel for hanging your picture.
[Return To List]
|
|
|
|